On this page you’ll find quick tips and tricks about game audio or digital audio in general which I have learned on the job and would like to share, to make all your lives easier.
Sometimes you just don’t learn these things in school, and nobody will tell you about them either. I’m hoping to spare you some time by sharing with you little helpful tips I found out about after just a little too long!
This will include tips on how to use software such as Reaper, Wwise, Unity, FMOD, and Fabric, but also integration tricks for game audio or recording techniques I like. I hope this will be useful!
==========================================================================
(scroll down to see all tips and tricks)
TIP #14 – Customize split action in Reaper for quick workflow with video
This tip is useful if you are used to work with a ‘scissor’ tool in ProTools for instance.
The default Reaper behavior when splitting items is to split under the edit cursor, but this can be annoying if working with a video, while you may want your edit cursor to remain in one position.
There is a quick way to customize this action so that you can split with a keyboard shortcut under the mouse cursor without moving the edit cursor.
- Click on the Actions menu –> Show actions list
- Enter keywords for desired action (for example ‘split’)
- Select action – Item: Split item under mouse cursor
- Go to Shortcuts for selected action (bottom left)
- Click Add…
- Enter desired shortcut, click OK
Using your custom shortcut will result in splitting an item under the mouse cursor without moving the edit cursor.
In addition, note that if the Snap function is enable, the split action will snap to grid.
See video for a quick demonstration:
TIP #13 – Make sure your sound files are mono compatible when exporting for mobile games
This is a quick one, and the title pretty much says it all.
When working on a mobile game, you need to make sure all your sound effects, including music, are mono compatible.
This doesn’t mean you need to export everything in mono, some players will plug their headphones in and you wouldn’t want to deprive them from the quality they are expecting.
However, those stereo sound files will need to be mono compatible, while some mobile devices only have one speaker. Whether you want it or not, the playback on device will be mono. If you have stereo sound files that are not mono compatible, this will result in phase issues and artifacts. In short, it’ll sound weird and off. So always double check!
TIP #12 – Use the Batch File/Item Converter in Reaper to export multiple selected files at once
In Reaper, you can use something called the Batch File/Item Converter (File>Batch File/Item Converter or Ctrl+Shift+F) to render many files (as many as you need) nearly instantly.

- Select the files you wish to render within the project using the right click object selection (as opposed to the time selection)
- click Add… > Add selected media item(s)
- Set output directory
- Set File name: use Wildcards to easily name your files coherently
- Either use source sample rate and channels or set new ones as desired
- Use FX if necessary
- Select format and bit depth
- Click Convert all.
In a few seconds, all the selected files will be rendered in the selected directory. This is extremely useful if you are working on variations of similar sounds or editing multiple tracks/items of a similar nature (such as footsteps or dialogue).
The process is extremely fast and even involves the same render options as the regular render window (such as render with markers or embed project tempo).
TIP #11 – Set a path to save media files in Reaper for clean project directories
In the Reaper Project Settings window, you can set a Path to save media files. This creates a subfolder within your project directory where all your media files will be saved, instead of having them at the same hierarchy level as the Reaper session file.
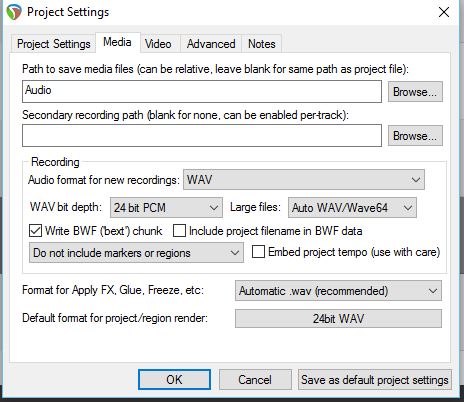
You can name it however you chose to, I have taken the habit of naming it ‘Audio‘ as it is often the case with other DAWs.
Click ‘Save as default project settings‘ to do this operation only once and apply it to every project.
This is quite a simple trick, but oh very useful when you have many sessions of many hundreds of files. It can become very messy, very quickly if these sort of precautions are not taken.
TIP #10 – Master Mixer and Submixers in Unity
This is very simple, but very important. When using Unity and/or Fabric/any other audio toolset within Unity using its Mixer, the Mixer needs to be divided into submixers.
The reason is this:
As long as any audio source is playing into this mixer or the mixer is
receiving audio data from other sub-mixers the mixer will keep itself active.
After the last sound source has finished playing, the mixer will wait for a
second and then continually use loudness-measurement at its own output do
decide if it should suspend itself.
This means that if everything is contained in one main Mixer, it will always be active, along with all the effects and routing it holds. This can result not only in significantly slowing down the gameplay and overuse of memory, but can (and most certainly will) crash the game.
By creating a hierarchy of Mixer and Submixers such as below, you can avoid these memory issues and make everyone’s life easier.

TIP #9 – Use the Wwise General Search option
Using the general search box will quickly locate and list all objects containing the characters mentioned in the search box.
You can even arrange the listed results per name, type or path, and have them loaded directly in their corresponding view (project explorer, soundcaster) by double clicking on the object, or in Schematic View.

TIP #8 – Find referenced objects using Wwise
This trick is very handy when you work on a project of a relatively large scale and progress becomes a bit messy, especially if working with a team.
You can check if objects are being referenced in any events by clicking the Current Selection tab in the Event Viewer, while having an event selected in your project explorer.
This will list all the events in which this object is referred. If there is no reference, you’ll want to make sure this object is not being loaded in a Soundbank while not used, taking up space for nothing.

TIP #7 – Find objects in Project Explorer using Wwise
This a quick tip not to underestimate for improving your workflow using Wwise.
You can locate objects from nearly anywhere in you Wwise project to find them in the explorer hierarchy. This is very useful when you are working on a large scale project and your explorer contains many objects and the hierarchies are complex.
You can do so by right-clicking events/items and select Find in project explorer > Sync group 1 (if you don’t want to open it in a new window).

You can locate objects from
- Event actions
- Loaded Soundbanks
- Soundcaster Sessions
- Schemaic View
- and more
TIP #6 – Use Wwise profiler’s Capture Log to precisely design with an animation
The Capture Log in the Profiler Layout is used to display all activity coming from the sound engine, mostly for debugging purposes.
You can use it locally while triggering the events in your Soundcaster Session, or by remotely connecting to your game, and profile in real time the information.
It is an extremely helpful profiling, debugging and troubleshooting tool, and what people may bot think of using it for, is designing.
Sometimes, you have to design sound effects for animated visuals. It could be for a character movement, a triggered special ability with a super power, a quick real time cinematic, loot collected, etc etc etc.
In order to avoid back and forth, designing to what you think is the start of the animation, turns out it’s not synced, go back to your DAW, adjust a bit until you get it right, you can use the Capture Log!
Connect to your game, trigger this animation, and watch the Capture Log (filter the Log to caputre only events if necessary, to make the data easier to read). The trick is to videocapture this whole process, and then import this video in your DAW. You can then design and perfectly sync the start and end of animation. Once you import your sound and trigger it with the event, the timing should be exactly as intended when designing.
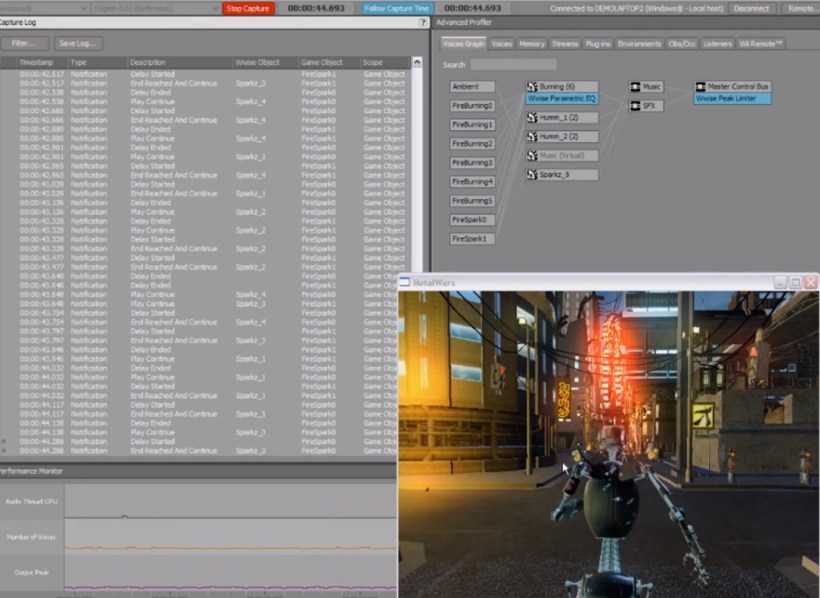
[image from https://www.youtube.com/watch?v=EjZKqDF3F3k]
TIP #5 – Limit sound instances in Wwise Advanced Settings
This feature is not in the General Settings, so could be less obvious if you are not looking for it.
Under the Advanced Settings tab of the Designer Layout in Wwise, you can limit instances of a sound, either per game object or globally, and by allowing to continue to play until the end or by killing the voice.

This is very useful for instance if you are working on a combat scene and there could be dozens of instances of the same ‘gun’ game object. This allows you to limit the number of instances of sounds generated by this game object while you don’t need to hear all of them, and saves memory for more important sounds.
TIP #4 – Render file including Markers from Reaper to use in Fabric
When I started to tackle music integration using Fabric, I noticed that it’s possible to Load Makers with an Audio Clip, in order to use those with the Music Component (Transitions – Sync on: Marker).
If using a soundfile without any markers embedded, you’ll get a message like this when trying to ‘Load Markers’:

So I found out how to render markers with a soundfile using Reaper. It’s really quite simple, but since I had never needed to use that feature before, I had to find out how.
Once your markers are set at the appropriate timing in your project (Ctrl+[number] to add a marker), simply press Ctrl+Alt+R to render as usual.
When in the Render settings window, you simple need to select ‘Markers Only’ (or whatever other option you need in the dropdown menu)

And render!
Then, in Fabric, you simply need to click on ‘Load Markers’ and you should see them as thin blue lines in the waveform display.

TIP #3 – Naming events in Fabric
This is a quick trick to name your events in Fabric in a clear and organised way.
It’s pretty simple. Here it comes.
Use slashes ////////
In the Fabric Event Manager, you can chose to name your audio events anything you want. So for instance if you have an event to trigger footsteps, you could call it
character1_footsteps_grass
There is nothing wrong with this, except when you end up with hundreds of events in your game, they will all show up as a looooooooonnnnng list when you select an event using the Event Listener Component.
What I suggest you to do, is naming it this way:
character1/footsteps/grass
It will basically divide your list in categories and subcategories, easy to organise, easy to find your events, much quicker to work with.
When you need to map your events in event mappers, behavior trees, event listeners etc etc etc. Every little thing helps to make your workflow faster!
TIP #2 – Fabric randomisers and hierarchy
This tip shows how to randomise values such as pitch and volume on a pool of audiofiles being triggered by one event, using Fabric.
Having used Wwise quite a bit, I was expecting that by entering a certain value in the ‘Volume Rand (dB)’ and ‘Pitch Rand (+/-)’ of a parent Random Component, this would trigger a variation in volume and pitch on every Audio Component child, every time it is triggered.

But that is not how it goes.
Setting a pitch randomiser of +/- 3 (semitones) will affect the pitch of the parent Random Component every time it is triggered. So all the sounds contained in this random component will, for example, be transposed 2 semitones higher. When this entire component stops playing, and is triggered again, a new value will be randomly chosen, and all the sounds contained in this random component will then, for example, be transposed 1 semitone lower.
My intention is that every time one of the child components (Audio Components) is triggered, variations in pitch and volume occur randomly according to the set values.
In order to do so, I need to set those values to each child component individually. Luckily, I can select multiple at a time and perform a group edit.
So beware of hierarchies!
TIP #1 – Fabric custom distance curve
I discovered this trick while working on spaceship engines in Unity using Fabric. The spaceships were positioned in 3D space, and their engines sounds were attached to the ships, so that they would fade away when you go further away from them.
First you need to understand that Fabric generates Unity Audio Sources to play audio (Fabric uses Unity’s audio engine).
Unity’s default distance curve is logarithmic, and looks like this:

Now if I enter Min and Max Distance values in the Fabric Component, such as these:
Min Distance: 300
Max Distance: 1500
I get a curve that looks like this one:

But what I want, is that passed the Max Distance of 1500, this sound cannot be heard anymore. Using this default curve, you will always hear the sound, even if quieter.
It took me a while to realise that, even though I select ‘custom’ curve in the Fabric options,
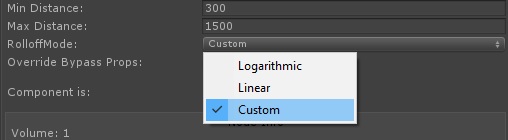
it’s actually not custom at all, until I manually add an AudioSource (Unity component) as a child of this one, so that I can set this curve myself.
If I don’t add an AudioSource, it will be automatically added once your Fabric component is loaded and active in the game, but you can’t edit that one in play mode and keep your changes, and you can’t edit it out of play mode since you won’t see it.
You’ll need to add the AudioSource (naming it something specific to the sound it’s attached to will come in handy), set the ‘Volume Rolloff’ to ‘Custom Rolloff’, and they play with the points yourself. This will replace the automatically added AudioSource.

Finally, you’ll have to set your values and curve, play the game, tweak those values in game to be just right, take note of them, stop the game, then go back to the AudioSource and replace the values.
It’s a bit of a painful process to not be able to keep changes made in play mode, but at least you can copy-paste those AudioSources once you are happy with one.
This turned out to be vital to me, I hope this was useful to some of you! 🙂
